gemellocattivo.com

Which means "Evil Twin". Lets see your projects where you change boring into fun or create the fun from scratch.
It is currently Wed Apr 24, 2024 3:43 pm

All times are UTC - 5 hours [ DST ]


Post new topic Reply to topic  [ 2206 posts ]  Go to page Previous  1 ... 105, 106, 107, 108, 109, 110, 111 ... 221  Next
Author Message
PostPosted: Fri Nov 12, 2021 11:06 am 
Offline

Joined: Thu Jan 01, 2015 6:47 pm
Posts: 4256
TheDarkSideOfWill wrote:

Same sensor, you just shined it up? What sensor is it? 2 wire? Your ECU is driving your gauges, right?


yes, same sensor that I nearly installed corroded and ugly :oops:

Yes, 2 wire GM coolant temp sensor

Yes, the ECU is now driving most of the gauges, including the coolant temp. The 308 gauges do not use normally sending units and have a reputaiton for being pretty inaccurate so now I use modern sensors to get accurate reading to the ECU and a calibration table in the ECU to get the gauge to match the ECU reading

TheDarkSideOfWill wrote:
The closest unit is the oil pressure switch/sender? Is it a gauge sender? What unit is it?


Pressure transducer that I am using to read oil pressure....accurately. Like the coolant Temp, it feeds the ECU and I use a calibration table in the ECU to send a signal to the gauge to make the gauge read a correct value. Here I didn't have much choice as the OEM type replacement sending units are NLA.


Top
 Profile Send private message  
 
PostPosted: Fri Nov 12, 2021 11:28 am 
Offline

Joined: Sat Jan 03, 2015 10:13 pm
Posts: 794
What is your oil pressure sender? Is it GM compatible or its own thing?


Top
 Profile Send private message  
 
PostPosted: Fri Nov 12, 2021 11:59 am 
Offline

Joined: Thu Jan 01, 2015 6:47 pm
Posts: 4256
TheDarkSideOfWill wrote:
What is your oil pressure sender? Is it GM compatible or its own thing?


generic 150psi transducer, $25 from amazon


Top
 Profile Send private message  
 
PostPosted: Fri Nov 12, 2021 10:26 pm 
Offline

Joined: Thu Jan 01, 2015 6:47 pm
Posts: 4256
Opened the new head gaskets
Attachment:
20211112_183946-resized-1024.jpg
20211112_183946-resized-1024.jpg [ 327.5 KiB | Viewed 2630 times ]


And the heads are on, hopefully for good.


Attachments:
20211112_211543-resized-1024.jpg
20211112_211543-resized-1024.jpg [ 325.66 KiB | Viewed 2630 times ]
Top
 Profile Send private message  
 
PostPosted: Sat Nov 13, 2021 3:39 pm 
Offline

Joined: Thu Jan 01, 2015 6:47 pm
Posts: 4256
I went out to the shop to start prepping the trans....and spent an hour looking at cams.

The best I can tell I timing the back to intake to to match bank 1....when I line up the timing marks, the lobes for cyl 7 are exactly matching the lobes for cyl 1, so its advanced by 60 crank degrees from where it belongs

Cyl 1
Attachment:
20211113_132255-resized-1024.jpg
20211113_132255-resized-1024.jpg [ 230.4 KiB | Viewed 2622 times ]


cyl 7
Attachment:
20211113_132302-resized-1024.jpg
20211113_132302-resized-1024.jpg [ 227.49 KiB | Viewed 2622 times ]


The exhaust was out a little less, but retarded not advanced so it about matched the timing on #4 I think it was, because why not right?  
Attachment:
20211113_142028-resized-1024.jpg
20211113_142028-resized-1024.jpg [ 255.23 KiB | Viewed 2622 times ]


The timing checking was made a bit easier by a knock on the front of the cams that the cam grinder used to time the 1st lobe...so I could use that and angle blocks to figure out what was where


I put some temporary marks on so they will be close when I drop them in.
Attachment:
20211113_133343-resized-1024.jpg
20211113_133343-resized-1024.jpg [ 253.86 KiB | Viewed 2622 times ]


The timing checking was made a bit easier by a knock on the front of the cams that the cam grinder used to time the 1st lobe...so I could use that and angle blocks to figure out what was where.


Attachments:
20211113_133343-resized-1024.jpg
20211113_133343-resized-1024.jpg [ 253.86 KiB | Viewed 2622 times ]
Top
 Profile Send private message  
 
PostPosted: Sat Nov 13, 2021 8:24 pm 
Offline

Joined: Thu Jan 01, 2015 6:47 pm
Posts: 4256
This afternoon I saw a show..you know that one where the couple had separated but run into eachother, end up spending the night together, then decide to move back in together and find out their old place is still available?


Attachments:
20211113_185627-resized-1024.jpg
20211113_185627-resized-1024.jpg [ 279.94 KiB | Viewed 2625 times ]
20211113_185656-resized-1024.jpg
20211113_185656-resized-1024.jpg [ 311.91 KiB | Viewed 2625 times ]
Top
 Profile Send private message  
 
PostPosted: Sun Nov 14, 2021 9:13 am 
Offline

Joined: Thu Jan 01, 2015 6:47 pm
Posts: 4256
I couple more pics from yesterday.
Attachment:
20211113_153554-resized-1024.jpg
20211113_153554-resized-1024.jpg [ 305.08 KiB | Viewed 2615 times ]

Attachment:
20211113_154138-resized-1024.jpg
20211113_154138-resized-1024.jpg [ 322.45 KiB | Viewed 2615 times ]

Attachment:
20211113_174323-resized-1024.jpg
20211113_174323-resized-1024.jpg [ 320.1 KiB | Viewed 2615 times ]


This puddle of coolant leaking from the trans disturbed me
Attachment:
20211113_173558-resized-1024.jpg
20211113_173558-resized-1024.jpg [ 222.88 KiB | Viewed 2615 times ]


But it turner out it has gotten behind the motor mount, probably when i drained the block to pull it so no worries
Attachment:
20211113_173602-resized-1024.jpg
20211113_173602-resized-1024.jpg [ 213.63 KiB | Viewed 2615 times ]


Top
 Profile Send private message  
 
PostPosted: Sun Nov 14, 2021 10:35 am 
Offline

Joined: Thu Jan 01, 2015 6:47 pm
Posts: 4256
I'll share this before I start so you guys have time to stop me if you see something wrong

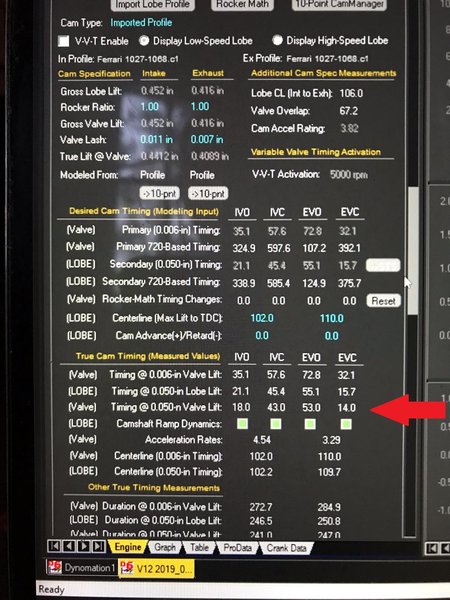
Time from the engine software. I
m using the marked row, true timing at .050 lift at the valve which accounts for lash, the line above is at the cam and would be how ferrari says to set timing by first setting the valve to 0 lash. The lobe are a symmetric grind, which means the lobe center, which is what I'm really setting is exactly in the middle so if I set opening and closing is off, I just split the difference and the lobe center will be correct.
Attachment:
timing.jpg
timing.jpg [ 496.49 KiB | Viewed 2615 times ]


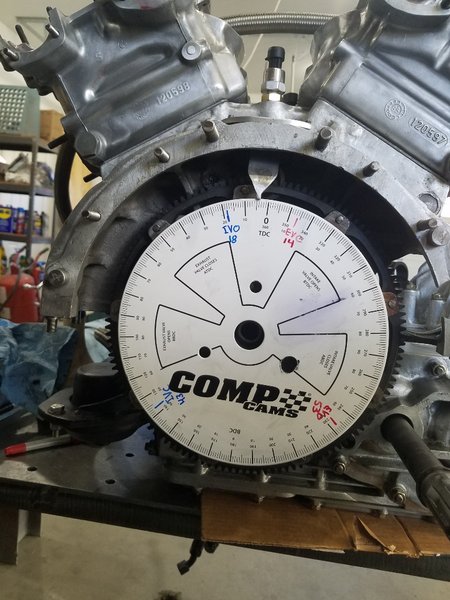
Degree wheel on and marked, blue is intake, red exhaust. My marks don't fall in the printed windows because I have the wheel on the flywheel not the damper so its backwards. This wheel is almost exactly the OD of my trigger pattern on the flywheel which I use for the ECU but also for reading timing so setting it up is as simple as stick it on with the 0 aligned with the TDC mark on the flywheel.

Attachment:
20211114_091509-resized-1024.jpg
20211114_091509-resized-1024.jpg [ 291.4 KiB | Viewed 2615 times ]


Last time I bolted it to the crank, I guess the flywheel wasn't finished? don't recall, anyway I I did bank 1 then calculated where bank 2 stuff should be and clearly buggered that math beyond belief, but this time its going to be different!....I'm just going to move the damn degree wheel and use the exact same marks. The trigger pattern is 36-1 so there is a tooth exactly every 10 degrees and the way I built is #1 TDC is exactly the center of a tooth marking #7 TCD exactly the center of the 6th tooth....no more dumbass mistakes...I hope....


Top
 Profile Send private message  
 
PostPosted: Sun Nov 14, 2021 11:10 am 
Offline

Joined: Sat Jan 03, 2015 10:13 pm
Posts: 794
Verified TDC with an indicator on the piston?
Verified valve events with indicator(s) on lifter(s)?

32 degrees of overlap doesn't seem like much, but I guess your engine model is leading you in that direction. If you have a high energy density in your exhaust stream, then it must not take much time to transfer that to the intake.


Top
 Profile Send private message  
 
PostPosted: Sun Nov 14, 2021 12:33 pm 
Offline

Joined: Thu Jan 01, 2015 6:47 pm
Posts: 4256
TheDarkSideOfWill wrote:
Verified TDC with an indicator on the piston?
Verified valve events with indicator(s) on lifter(s)?

32 degrees of overlap doesn't seem like much, but I guess your engine model is leading you in that direction. If you have a high energy density in your exhaust stream, then it must not take much time to transfer that to the intake.


Once the timing chain is on, I will confirm the wheel is installed correctly, then check the cams.

On overlap...I don't have a ton of duration, 241/247 @.050 you can see it at the bottom of the cam info shot. Up[ higher on the screen shot you can see it say 67.2 degrees overlap, which is at .006". The program and SAE spec do everything at .006 before that is where they say flow effectively starts/stops. I have pretty high flowing heads so what's flowing becomes significant quickly as the valve open to the point that changing the lash setting even .002" changes the output from the software. My intake cam has relatively long accel/decel ramps which the software HATED, so I set the lash pretty loose to help. Year ago I saw a maserati with .013" intake lash and thought it odd....but no doubt they were trying to reduce the seat to seat numbers a bit just as I found myself doing.

Cams in and at least look correct


Attachments:
20211114_105108-resized-1024.jpg
20211114_105108-resized-1024.jpg [ 299.3 KiB | Viewed 2613 times ]
Top
 Profile Send private message  
 
Display posts from previous:  Sort by  
Post new topic Reply to topic  [ 2206 posts ]  Go to page Previous  1 ... 105, 106, 107, 108, 109, 110, 111 ... 221  Next

All times are UTC - 5 hours [ DST ]


Who is online

Users browsing this forum: Bing [Bot] and 7 guests


You cannot post new topics in this forum
You cannot reply to topics in this forum
You cannot edit your posts in this forum
You cannot delete your posts in this forum
You cannot post attachments in this forum

Jump to:  
cron
Powered by phpBB® Forum Software © phpBB Group